In development of a social platform for work, I found myself needing to support the creation of links for commons items such as, hashtags, urls, phone numbers, emails, etc. First instinct was, someone definitely has a solution for this! Thankfully, that turned out to be true (h/t Greg Jacobs).
I knew Autolinker.js could save me a ton of time, with little implementation efforts if I simply built it into an Angular pipe. So, using the library I built a custom class for my own personal settings I would need, then built out the pipe to call within the innerHTML of a paragraph tag. And… that’s really all it took!
Implementation
So, to give you a quick glimpse of how to do this yourself, I built out a quick Ionic Angular project using the list starter. The full code can be found here. To start your own, you can use the following:
$ ionic start ionic-linkify list --type=ionic-angular
$ cd ionic-linkify
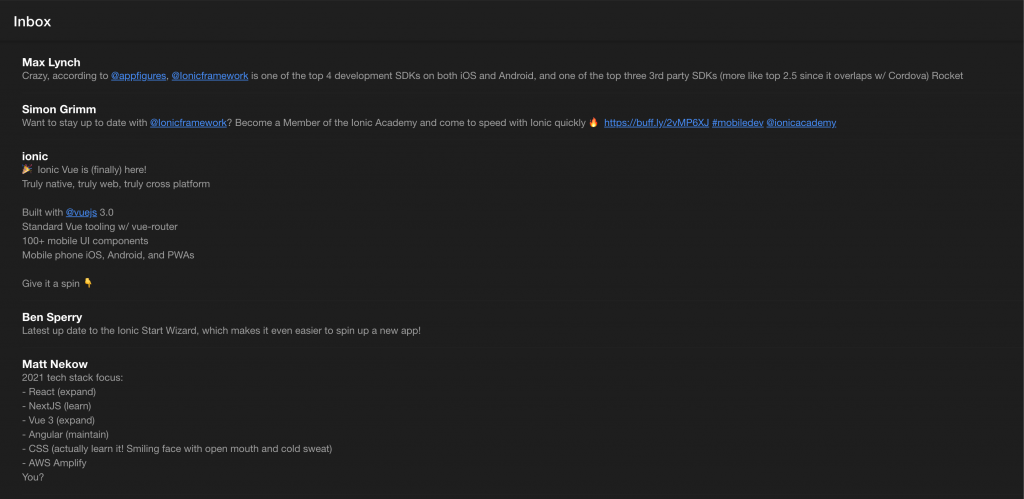
$ ionic serveOnce that was ready, I did some work to convert the “message” data to “tweet” data. I thought grabbing some fake tweet data would be a good way to demonstrate the concept. I turned to Simon Grimm‘s fake tweet data he used in one of his recent Twitter UI tutorials, so I didn’t have to create my own. The conversion involved mocking up the interface to the Tweet objects and pasting in the static list of tweets from Simon’s endpoint into the service. I did this to keep the example simple and not build out the HttpClient logic necessary. There are plenty examples out there to build a quick-and-dirty API call. The service looks as follows:
// data.service.ts
...
export interface Tweet {
  username: string;
  handle: string;
  like: number;
  retweets: number;
  response: number;
  text: string;
  link?: string;
  date: string;
  liked: boolean;
  retweet: boolean;
  attachment?: string;
  img: string;
}
...
export class DataService {
  ...
  public tweets: Tweet[] = [
    {
      username: "Max Lynch",
      handle: "maxlynch",
      like: 446,
      retweets: 173,
      response: 21,
      text:
        "Crazy, according to @appfigures, @Ionicframework is one of the top 4 development SDKs on both iOS and Android, and one of the top three 3rd party SDKs (more like top 2.5 since it overlaps w/ Cordova) Rocket",
      date: "1581322823",
      liked: true,
      retweet: false,
      attachment:
        "https://devdactic.fra1.digitaloceanspaces.com/twitter-ui/attachement-0.jpeg",
      img:
        "https://devdactic.fra1.digitaloceanspaces.com/twitter-ui/twitter-max.jpg",
    },
    ...
  ];

  ...

  public getTweets(): Tweet[] {
    return this.tweets;
  }
}
Once that was ready to go, I created my Linkifier class to hold my “linkify” settings. The class to follow looks a touch different than the one I implemented into my work project’s build, but I wanted to keep it a more generic use case here:
// linkifier.ts
import { Autolinker, AutolinkerConfig, HashtagMatch } from "autolinker";

const AUTOLINKER_CFGS: AutolinkerConfig = {
  urls: {
    schemeMatches: true,
    wwwMatches: true,
    tldMatches: true,
  },
  email: true,
  phone: true,
  mention: "twitter",
  hashtag: "twitter",
  stripPrefix: false,
  stripTrailingSlash: false,
  newWindow: true,
  truncate: {
    length: 0,
    location: "end",
  },
  decodePercentEncoding: true,
};

export class Linkifier {
  private autolinker: Autolinker;

  constructor() {
    this.autolinker = new Autolinker(AUTOLINKER_CFGS);
  }

  public link(textOrHtml: string): string {
    return this.autolinker.link(textOrHtml);
  }
}
After that was good to go, it was time to add in the pipe:
// linkify.pipe.ts
...
@Pipe({
  name: "linkify",
})
export class LinkifyPipe implements PipeTransform {
  private linkifer: Linkifier;

  constructor() {
    this.linkifer = new Linkifier();
  }

  transform(value: string): string {
    return this.linkifer.link(value);
  }
}

@NgModule({
  declarations: [LinkifyPipe],
  exports: [LinkifyPipe],
})
export class LinkifyPipeModule {}
So, the pipe’s transform is quite simple. After the Linkifier is initialized in the constructor, holding all of the necessary logic behind the scenes, all that must be done is to return the value from calling the link function. As shown in the class above, this function merely takes in text or html and “linkifies” it based on the rules setup in the configuration. It then returns the appropriate HTML. This is why we’ll house the result in the innerHTML of our p tag so it renders properly as a link:
<p [innerHTML]="tweet.text | linkify"></p>Alright, so after importing the LinkifyPipeModule defined above into the Tweet component module for use, and modify the tweet output, we get the result!
Again, for a full copy of the code, you can navigate to the github repo!